The EA paper I co-authored with Jason Ansel, Saman Amarasinghe and Una-May O’Reilly was accepted to GECCO 2011! The paper describes a novel Evolutionary Algorithm for solving incrementally structured, bottom-up problems. We evaluated our approach in the program autotuning context. Here’s the full abstract:

Many real world problems have a structure where small problem instances are embedded within large problem instances, or where solution quality for large problem instances is loosely correlated to that of small problem instances. This structure can be exploited because smaller problem instances typically have smaller search spaces and are cheaper to evaluate. We present an evolutionary algorithm, INCREA, which is designed to incrementally solve a large, noisy, computationally expensive problem by deriving its initial population through recursively running itself on problem instances of smaller sizes. The INCREA algorithm also expands and shrinks its population each generation and cuts off work that doesn’t appear to promise a fruitful result. For further efficiency, it addresses noisy solution quality efficiently by focusing on resolving it for small, potentially reusable solutions which have a much lower cost of evaluation. We compare INCREA to a general purpose evolutionary algorithm and find that in most cases INCREA arrives at the same solution in significantly less time.

The paper is available in full here:
An Efficient Evolutionary Algorithm for Solving Incrementally Structured Problems

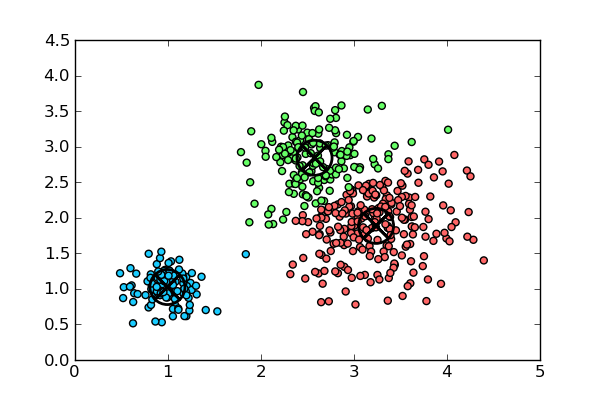
I had to illustrate a k-means algorithm for my thesis, but I could not find any existing examples that were both simple and looked good on paper. See below for Python code that does just what I wanted.

#!/usr/bin/python
 
# Adapted from http://hackmap.blogspot.com/2007/09/k-means-clustering-in-scipy.html
 
import numpy
import matplotlib
matplotlib.use('Agg')
from scipy.cluster.vq import *
import pylab
pylab.close()
 
# generate 3 sets of normally distributed points around
# different means with different variances
pt1 = numpy.random.normal(1, 0.2, (100,2))
pt2 = numpy.random.normal(2, 0.5, (300,2))
pt3 = numpy.random.normal(3, 0.3, (100,2))
 
# slightly move sets 2 and 3 (for a prettier output)
pt2[:,0] += 1
pt3[:,0] -= 0.5
 
xy = numpy.concatenate((pt1, pt2, pt3))
 
# kmeans for 3 clusters
res, idx = kmeans2(numpy.array(zip(xy[:,0],xy[:,1])),3)
 
colors = ([([0.4,1,0.4],[1,0.4,0.4],[0.1,0.8,1])[i] for i in idx])
 
# plot colored points
pylab.scatter(xy[:,0],xy[:,1], c=colors)
 
# mark centroids as (X)
pylab.scatter(res[:,0],res[:,1], marker='o', s = 500, linewidths=2, c='none')
pylab.scatter(res[:,0],res[:,1], marker='x', s = 500, linewidths=2)
 
pylab.savefig('/tmp/kmeans.png')

The output looks like this (also available in vector format here):

The X’s mark cluster centers. Feel free to use any of these files for whatever purposes. An attribution would be nice, but is not required :-).

Since today morning, Scheme Power Tools includes out-of-the-box support for unit tests. This article serves as a short introduction to the testing framework. If you are only looking for the documentation, you can find it at http://mpacula.com/scheme-tools/docs/unit-testing.html.

Writing Tests

The testing framework was designed to be simple and hassle-free. It exposes two primary constructs: unit-test and test-suite. The unit-test macro takes a name and a sequence of expressions, and constructs a new unit test. For example:

(unit-test "example test"
   (assert-equal 5 (+ 2 3))
   (assert-equal-fp 0 1e-14 1e-13)
   (assert (even? 3) "Expected the number to be even")

Multiple unit-test‘s can be combined using a test-suite. For instance:

(test-suite "Example Suite"
  (unit-test "example test"
   (assert-equal 5 (+ 2 3))
   (assert-equal-fp 0 1e-14 1e-13)
   (assert (even? 3) "Expected 3 to be even"))

  (test-suite "My Embedded Suite"
   (unit-test "test1"
             (assert-equal 4 (* 2 2))
             (assert-equal 4 (+ 2 2)))

   (unit-test "test2"
              (assert-equal 10 (* 3 3))
              (assert-equal 6 (+ 3 3)))))

The code above defines a test suite “Example Suite“, with one unit test called “example test“, and an embedded test suite “My Embedded Suite“.

Running Unit Tests

Tests are run by calling enable-unit-tests first, and then invoking run-suite on the test suite of interest. The need to explicitly call enable-unit-tests allows tests to be embedded directly in the source files whose functionality they are testing, without them being executed every time the files are loaded.

When running a test, all errors are automatically handled and printed on the screen. Summaries with the number of passed and failed tests are also printed on a per-suite basis. For instance, when running the “Example Suite” defined earlier, the output should look like the following:

* Running "Example Suite"... 
    * Running "example test"... FAILED:
      Expected the number to be even
    * Running "My Embedded Suite"... 
        * Running "test1"... OK
        * Running "test2"... FAILED:
          Assertion failed. Expected:  10  but got:  9
        -------------------------------------
        SUITE SUMMARY (My Embedded Suite)
        1/2 tests passed.
        There was 1 failure.
        -------------------------------------

    -------------------------------------
    SUITE SUMMARY (Example Suite)
    1/3 tests passed.
    There were 2 failures.
    -------------------------------------

Asserts

The framework supports the following assert functions:

  • assert: the most generic of all asserts. Takes a value and an optional error message, and fails if the value is #f.
  • assert-not: the inverse of assert – fails if the supplied value is not #f.
  • assert-equal: takes an expected and actual value, and verifies that the two are equal (using equal?).
  • assert-equal-fp: like assert-equal, but for floating point numbers. Takes an optional third parameter precision (default value 1e-9), which specifies the maximum amount by which the two numbers can differ.

As always, your feedback is greatly appreciated. Happy coding!

Testing any kind of software is difficult. The programmer is faced with a multitude of choices and trade-offs: what components to test and in what scenarios, how much time to spend writing test cases vs. developing new features, and so on. No matter how hard, many acknowledge that testing is paramount to producing a quality product. So important, in fact, that companies like Microsoft make software testing a full-time position.

And if testing most software is hard, testing statistical software is even harder. For most of my programming career I hardly had to deal with statistics and “big data” problems. As a result, when I embarked upon my first significant statistical project a year ago, it proved to be a major source of frustration. In this post I hope to share my experiences with testing statistical code. I will start by describing my initial sources of difficulty stemming from the differences between statistical and non-statistical programs. I will then present a number of testing guidelines which I have found to be particularly effective, and which avoid some of the pitfalls I would initially get myself into.

The initial discussion and guidelines are primarily about probabilistic software, which is just a subset of the possible statistical programs you could write. However, later sections deal with statistical software in more generality.

How Many Outcomes?!

Testing non-statistical software components often involves executing some action which can result in some fixed number of outcomes, and then verifying that the actual outcome is what we expected. For example, one might write the following code in Java:

     Set<String> hat = new HashSet<String>();
     hat.add("rabbit");
     Assert.assertTrue(hat.contains("rabbit"));

In the above case, there are two possible outcomes of an “insert” operation: either the set contains the added element, or not. Having inserted an element into the set, we check whether the outcome is what we want it to be. Of course, in real programs tests are more complicated and often involve a significantly larger number of possible outcomes. However, the outcomes still usually form a set of a manageable size.

Statistical code differs in two significant ways:

  • there are several orders of magnitude more possible outcomes of an operation
  • it is often not obvious which outcomes are correct

I will try to illustrate the impact of the two points above on an example. Consider a Maximum Likelihood Estimator (MLE) – arguably one of the simplest statistical tools. An MLE counts the occurences of an element in a sequence of observations , and uses that to estimate the probability of that element. For example, if you observe three dogs and two cats, then an MLE would estimate the probability of each as 0.6 and 0.4, respectively. Notice how the outcome of an MLE is a number – a number that we cannot conveniently restrict to a small set of possible values. Not even in the range 0-1, since we cannot make correctness assumptions about the very thing we are testing. It can be said that despite the large number of possible outcomes, it is straightforward to say which are correct. That is often not the case, however, as the dataset might be too large or the model too complex to manually estimate probabilities. And even in cases when such manual estimation is possible, it is all to easy to make mistakes.

To make matters worse, the naive MLE is an oversimplified example. Consider only a slightly more sophisticated estimator, called an Absolute Discounting Estimator (ADE). An ADE subtracts a (small) probability mass from seen events, and distributes it across unseen events. This process of transferring probability mass, so called “smoothing”, is of paramount importance in applications such as spam classification and statistical Natural Language Processing. Let’s first define an ADE mathematically: let be the sequence of observations, where each observation belongs to a set of possible events, and let be a constant which controls the amount of smoothing. An ADE is then defined as:

While only slightly more complicated than an MLE, testing the ADE on large datasets can be a nightmare if you simply compare hard-coded estimates. You have to test that the ADE behaves correctly for different values of , and possibly on different datasets. It would be a Herculean task to manually compute all those probabilities, and then test the ADE against these estimates. That’s what I used to do as a beginner, and calling my experiences frustrating would be an understatement.

Obey Probability, It’s The Law!

Luckily, when it comes to probability, there are a few simple guidelines that make testing much easier. They might sound obvious to many, but the obvious sometimes needs pointing out, especially if our mindset is from another, non-statistical domain.

A great thing about probability is its extensive mathematical foundation, and the fact that it obeys several rather simple laws. Instead of testing the returned values directly, test that your components behave properly with respect to the laws of probability. No matter how complicated your model, or how large the test dataset, these laws should always hold. Always. Some of the laws I have found particularly useful are outlined below.

Stay positive

Make sure that every probability produced by your code is non-negative. While this may sound trivial, in many cases it is not. Consider the ADE formula I showed earlier – it has a flaw that might not be immediately obvious. Namely, if , we will get negative probabilities for infrequent elements! This problem might be extremely hard to track down in production, since the wrong answer produced by an ADE will usually be propagated through a long chain of other mathematical operations.

Be normal(ized)

If your code defines a discrete probability distribution, as in the case of a classifier, make sure that the probabilities of all events add up to one. Since this test requires your code to produce probabilities for all possible arguments, it has a good chance of detecting miscalculations for any single one.

Know your maginals

I have found marginalization to be extremely useful for testing classifiers, and it applies to other kinds of programs, too. It relies on the formula:

In many cases, you know the value of (for example, it might be your prior), and you know how to compute with the component you are testing. And even if you do not know , you can often compute it using conditional probabilities:

.

Similarly to normalization, marginal probabilities require you to compute probabilities for all possible values of an argument, and are good at catching any single miscalculation. They also have another advantage: you only have to sum over the possible values for one argument, which is computationally cheaper than summing over possible values for all arguments, as would be required by normalization.

Of course, the above list of probability laws is by no means exhaustive, and it is always a good idea to open a probability textbook and search for formulas that apply directly to your problem. For example, there is a large body of theory behind Markov Chains, and if Markov Chains is what you are testing, the relevant formulas will probably be better at testing your code than the general laws outlined above. No matter what laws you end up using in your code, however, the message is the same: try to avoid testing exact values if possible, as they are too parameter-dependent and too hard to correctly calculate manually – and use probability laws instead.

All Your Baseline Are Belong To Us

A good way to test any statistical software is to compare its performance against some reasonable baseline. For example, suppose you are developing a very sophisticated reinforcement learning system, and initial tests show great performance. The problem is that “great” is relative, and you never truly know how good your method is until you compare it to something else. Last week I was working with my CSAIL collegues on a paper for a large Machine Learning conference. We devised a clever method to apply Multi-armed Bandit techniques to online multi-objective tuning of computer programs. We gathered a lot of data, did statistical analysis and then plotted the average performance of a benchmark program as a function of time (lower is better):
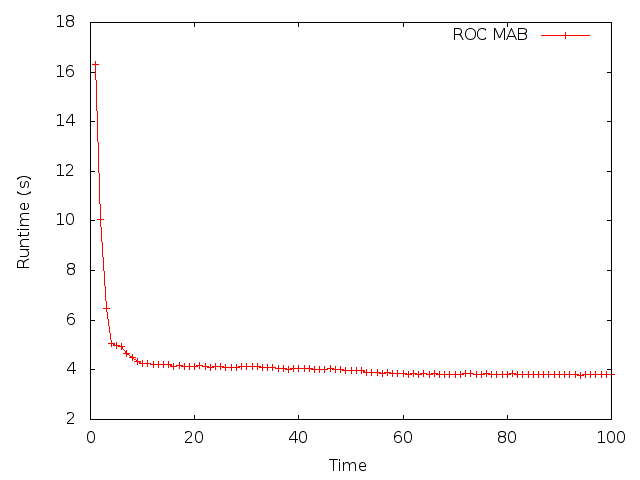

Runtime of sort

We were excited since our approach seemed to converge very fast, and reduced the runtime of the benchmark by a significant amount. However, we then compared the performance of our method to a naive, “uniform random” baseline. Here is what we saw:
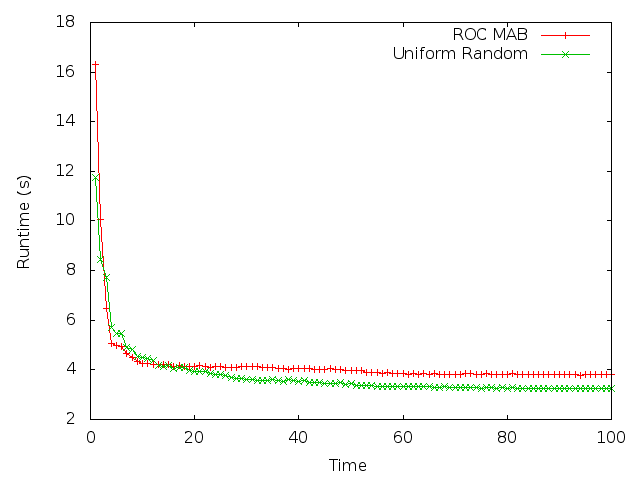


Uniform random clearly outperformed our method, regardless of how good the results initially looked. This allowed us to discover a major problem with our methodology – we did not correctly optimize hyperparameters. It also emphasized how important and useful it is to test your code against a baseline. Not only will it show how well your code performs, but also whether it performs worse than you expect it to. If it does perform worse, it might indicate a serious bug, as it did in our case.

You might argue that baseline testing is not really useful as a unit test, since it involves looking at plots and making inferences about behavior, but that is not necessarily true. There are many ways you can programmatically compare the performance of one method against another, such as Student’s t-test. It was in fact a t-test analysis of our benchmark data that allowed us to conclude that our buggy program was no better than a naive approach.

It’s All Magic!

My final point is not so much about writing unit tests, but about designing for testability. A few years ago, before I took any formal courses in probability and statistics, I would often use “magic”, ad-hoc scores for various things to indicate, for example the “likelihood” that candidate is better than candidate . While in many cases using such ad-hoc scores can seem straightforward and their use tempting, they are a nightmare to test. This is due to the fact that there is usually no sound theory to support them, and if you want to evaluate their performance and/or test them you cannot rely on any laws or tried analysis tools. Because of this, try to resist the temptation to use magic scores and other such metrics, no matter how straightforward to implement they are. More often than not, as I learned all too well, they will only lead to problems later on. Whenever possible, try to re-formulate your problem in terms of probabilities and other well-founded metrics. I wish somebody had said this to a younger me – how many hours of frustration it would have saved!

Go Forth and Estimate

That’s it, folks. In this article I tried to describe why, in my opinion, statistical software is much harder to test compared to “ordinary”, non-statistical programs. I argued that it was due to the sheer number of possible outcomes that statistical components can produce, and it is not always immediately obvious which of those outcomes are the correct ones. I gave a few guidelines that I personally found very useful when testing various kinds of statistical programs – both probabilistic and non-probabilistic. Finally, I made a case why magic, ad-hoc scores should not be used in place of probability whenever possible.

I hope you found my entry useful – there’s surprisingly little about testing statistical code on the Internet. As always, please let me know your thoughts and comments. Now, go back to your statistical programs and estimate (hopefully correctly)!

Thanks to Daniel Firestone for reading drafts of this article.
Introduction

Last week I released Scheme Power Tools (SPT) – an assorted collection of Scheme utilities. Since then, I have received a few requests to implement pattern matching. Pattern matching is a boilerplate-reducing feature that I greatly missed from Haskell, so given the popular demand I decided to add it to SPT. After a weekend of coding, the latest release supports Haskell-style, native pattern matching out of the box. You can view the documentation here, with the pattern language described here. Special thanks go to Matt Peddie, who originally suggested this feature, and to Gerry Sussman for the 6.945 pattern matcher, which inspired this implementation.

Pattern-Directed Dispatch (pdefine)

SPT implements a macro, pdefine, which allows for multiple function definitions, each with different argument patterns. As a “hello, world” of pattern matching, here’s how one can use pdefine to define the factorial function:

(pdefine (fact 0) 1)
(pdefine (fact ?n) (* n (fact (-1+ n))))

Multiple-argument functions are supported as well. For example, to implement vector addition where a vector is a cons pair of coordinates, you can use a “pair” pattern that binds each component to a name:

(pdefine (vector-add (?x1 . ?x2) (?y1 . ?y2))
         (cons (+ x1 y1) (+ x2 y2)))

Easy enough. The pattern language also supports segment variables (denoted ??[name]), which match sublists of arbitrary length – a feature which sets SPT apart from the mainstream pattern-matching languages like Haskell. Segment variables do a search over the possible sublists until either the entire pattern matches, or all possible sublists have been tried. For example, one might use segment variables to implement a function which checks whether a list contains a number, anywhere in the list:

(pdefine (has-number? (??prefix (? num ,number?) ??suffix)) #t)
(pdefine (has-number? ?obj) #f)

Similarly, segment variables can be used to implement map:

(pdefine (my-map ?func ()) '()) ; base case: empty list
(pdefine (my-map ?func (?first ??rest))
         (cons (func first) (my-map func rest)))

Pattern Let (plet)

In addition to pdefine, Scheme Power Tools also implements plet and plet*, which are like their off-the-shelf counterparts let and let*, but with support for arbitrary patterns in place of variables. For example:

 (define (vector-add x y)
   (plet (((?x1 . ?x2) x)
          ((?y1 . ?y2) y))
         (cons (+ x1 y1) (+ x2 y2))))

Pattern Case (pcase)

Pattern case (pcase) allow the user to execute different code depending on what pattern matches the given datum (see documentation for more details). For example, the snippet below uses pcase to check whether a list contains the specified element:

(define (find elt a-list)
  (pcase a-list
         ((??prefix ,elt ??suffix) elt)
         (? #f)))   ; default case

Wrapping Up

As always, I hope you find Scheme Power Tools useful. I welcome all suggestions and feature requests, and of course let me know of your experiences!

Today I released a library that adds multimethods to Java and .NET. Multimethods give you the ability to call methods based on the runtime type of arguments, eliminating the need for the Visitor pattern. They can help you write code that is loosely coupled, less verbose and easier to understand.

I tried to make the library as straightforward to use as possible. To call a method (in Java), simply write:

Multimethod.call(/*return type*/, /*target object*/, /*method name*/, /*arguments*/)

For example:

Multimethod.call(Shape.class, this, "intersect", new Rectangle(10, 10), new Circle(5))

Multimethod.call will dispatch to a method that matches the arguments in the most type-specific way, automatically detecting ambiguities. It will also dispatch based on the number of arguments, and will perform boxing/unboxing as necessary.

You can get the library from its github repository, packaged up and ready to use in Java, .NET 3.5+ or Silverlight for Windows Phone 7. Don’t forget the check out the reference and tutorials in the project wiki.

Hopefully, multimethods will make your life a bit easier. Happy coding!

Introduction

Scheme is probably the most useful little language I know. Having learned it in MIT’s intro Computer Science class 6.001: Structure and Interpretation of Computer Programs, I was surprised to discover that it made me significantly more productive than Java or C++, despite its simplicity. Not only was I able to quickly write symbolic software, which is where Lisps arguably excel, but I also found it easy to write more “odinary” programs, such as a web server.

Learning Scheme

The next few articles are going to cover some of the software I have written in Scheme, and assume basic familiarity with the language (if you have no experience with Scheme but have used other Lisps, you should be fine. Hakellers are also welcome.). If you have no experience with Scheme, however, fret not! There is a number of great (and free) learning resources on the Internet:

Installing Scheme

In order to run my code, you will need to install MIT Scheme – a cross-platform Scheme programming environment available at http://www.gnu.org/software/mit-scheme/. The website includes detailed installation instructions for Unix, Windows and MacOS. If you are running Ubuntu, you can simply use the package manager:

sudo apt-get install mit-scheme

That will take care of installing MIT Scheme and some additional tools, such as scheme-mode for emacs.

In order to see if MIT Scheme has been successfully installed, type mit-scheme in the terminal (or the command prompt in Windows). You should get an output similar to the following:

MIT/GNU Scheme running under GNU/Linux
Type `^C' (control-C) followed by `H' to obtain information about interrupts.

Copyright (C) 2010 Massachusetts Institute of Technology
This is free software; see the source for copying conditions. There is NO
warranty; not even for MERCHANTABILITY or FITNESS FOR A PARTICULAR PURPOSE.

Image saved on Tuesday March 9, 2010 at 6:41:34 PM
  Release 9.0.1 || Microcode 15.1 || Runtime 15.7 || SF 4.41 || LIAR/i386 4.118
  Edwin 3.116

1 ]=> 

If that is what you see, great! You can now start editing and running Scheme code.

Editing Scheme

To edit Scheme code, you can use any of your favorite text editors, be it vim, Emacs or gedit. Personally, I do all of my Scheme development in Emacs, which is available in most Linux distributions, and can also be installed on MacOS and Windows.

If you are using Emacs and have installed MIT Scheme through the package manager, you should already have scheme-mode available. Otherwise, you can get it from here. The following is a brief list of keyboard shortcuts I most commonly use:

M-x run-scheme starts the Scheme interpreter in a new buffer, *scheme*
M-o sends current buffer to the interpreter
C-x e sends the expression to the left of the cursor to the interpreter
M-p (REPL) inserts previous expression at point
M-n (REPL) inserts next expression at point

When sending a buffer to the interpreter, make sure all your parentheses are matching, or you will get unexpected behavior when sending buffers or expressions later. If you do make this mistake, however, typing C-c C-c at the prompt should fix it.

If you want to enable automatic paren matching (which you most likely will), append this snippet to your .emacs file:

(setq show-paren-delay 0
      show-paren-style 'parenthesis)

(show-paren-mode 1)

And if you ever create macros which you would like to be treated as keywords, you can use the following elisp function:

(defun register-scheme-keywords (keywords)
  (mapc #'(lambda (kword)
            (font-lock-add-keywords 'scheme-mode
                                    `((,(concat "\\(" kword "\\)") 1 font-lock-keyword-face))))
        keywords))

  ;; Example: (register-scheme-keywords '("defgen" "fluid-let"))

Debugging Scheme

MIT Scheme comes with a great debugger. If you ever get an error, simply type (debug) at the prompt. You will get an output similar to the following:

Subproblem level: 0 (this is the lowest subproblem level)
Compiled code expression (from stack):
    (let ((value ###))
      (repl-history/record! (%record-ref (cmdl/state repl) 5) value)
      value)
 subproblem being executed (marked by ###):
    (hook/repl-eval s-expression environment repl)
Environment created by the procedure: %REPL-EVAL

 applied to: ((breakpoint) #[environment 11] #[cmdl 12])
There is no execution history for this subproblem.

The expression marked by ### shows which code was being executed when the execution stopped. This is the code that caused the exception. To move up or down the call stack, press “u” or “d”, respectively.

If you would like to use breakpoints, use the breakpoint procedure. For example:

(define (my-function)
  (do-stuff)
  (breakpoint)
  (do-other-stuff))

When the interpreter hits the breakpoint, you can type (debug) to inspect the execution.

Wrapping up

Hopefully, by now you have a functional Scheme development environment up and running. If anything went wrong, feel free to ask about it in the comments.

Now, without further ado, let’s start hacking!

I have been wanting to start a blog for a long time, but something was always in the way – either coursework, an internship or a pet project. Having been an undergrad at MIT, I was overloaded with work for most of the year, and worked full-time during the summer. The few free days I preferred to spend either with my girlfriend and family, or working on a project I was excited about. Blogging simply seemed like a distraction.

So why start now? Well, first of all I graduated and suddenly found myself having extra free time. Granted, I am going to be a grad student for the next year, but from what I have heard the workload is not as bad. It also helps that it’s summer, and for a change I decided to work for an established company rather than an early-stage startup. And as much as I enjoy startup culture, not having to come in on Saturdays has its advantages.

I also realized that I have number of pet projects that I have never published anywhere. Which is a shame, as I devoted a lot of time to them, and I still find some of them quite useful. Hopefully, this blog will be a venue for me to describe what I have been working on. And if any of my readers find the posts informative or useful in any way, I would be honored. Being an engineer, I love seeing my ideas applied!

On a more personal note, I thought it would be great to have a place on the web where I can write about the more important events in my life, and share them with friends through a single URL. A blog seems to be a perfect tool for that.

Finally, now that we got the introduction out of the way, let’s get started!